

The Mac is a productiveness machine. Lengthy gone are the instances when your laptop crashed weekly and also you misplaced your unsaved doc, spreadsheet, or a last-minute essay that was due on the subsequent day.
Due to Apple, you need to use a dependable Mac or MacBook to work arduous in your initiatives, get your homework finished shortly, and nonetheless have time to look at an episode of your favourite present.
Not solely that, however the Mac additionally has some lesser recognized options that may show you how to develop into extra productive, thus scale back the time to finish these duties.
All that you must do is to present it a strive, choose one or two, and begin utilizing a few of these suggestions.
1. Copy and Paste Any Textual content From Your iPhone

When you have a Mac and an iPhone, chances are high you’re utilizing the identical Apple ID between them. If that’s the case, you need to use a reasonably cool function that may show you how to copy textual content out of your iPhone and paste it in your Mac (or the opposite manner round).
That is due to a function referred to as Handoff, however you’ll have to manually allow it in your Mac and your iPhone. That is how:
Learn how to Allow Handoff on iPhone
- Open the Settings app.
- Scroll down and choose Normal.
- Faucet on Airplay& Handoff.
- Toggle Handoff on.
Learn how to Allow Handoff on Mac
- Click on on the Apple menu within the high left nook of your display.
- Go to System Settings.
- Choose Normal from the left-side menu.
- Click on on AirDrop & Handoff.
- Toggle Enable Handoff between this Mac and your iCloud gadgets.
Now all that you must do is copy some textual content in your iPhone after which paste it in your Mac. Remember the fact that this may not work on each third-party app you utilize, but it surely’ll work nice on first-party apps like Safari or Pages.
Additionally, keep in mind that with a purpose to use this function, each your iPhone and Mac want to make use of the identical Apple ID, and each gadgets have to have Bluetooth turned on.
2. Search the Net Utilizing Nothing However Highlight Search
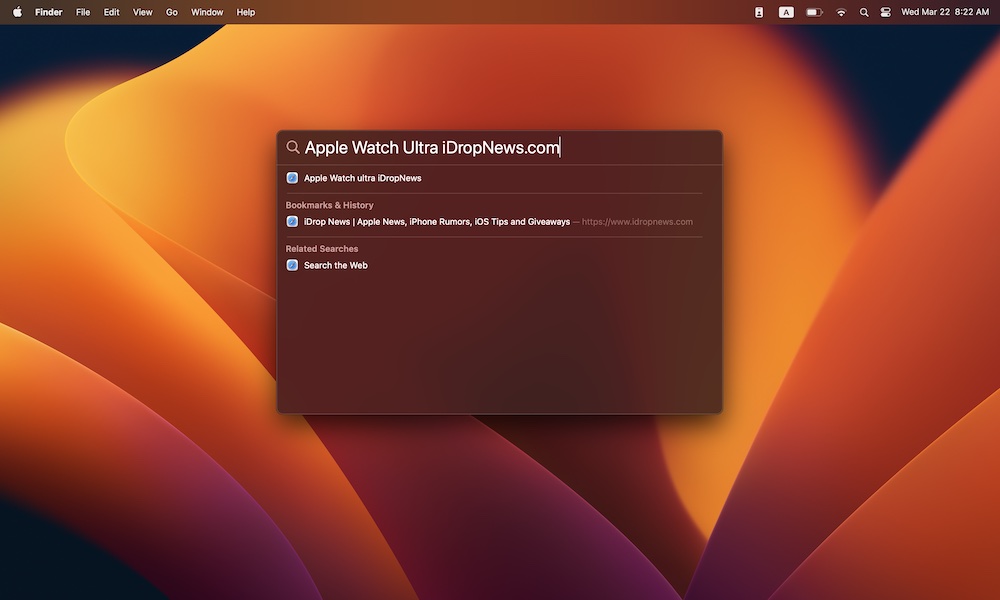
The Mac’s Highlight Search function is an unimaginable device that may show you how to discover any file or app that’s put in in your Mac. However do you know which you can additionally use it to go looking the net with out having to open your Safari browser?
All that you must do is open Highlight by clicking the magnifying glass within the high proper nook of your display after which looking for the time period you need. When you press the Return key, Concentration is going to open Safari (or your default browser) and seek for something you entered.
Not solely that, however when you’ve looked for this time period earlier than, Highlight can even present you a listing of your historical past and bookmarks, so it’s simpler to go to your favourite web sites.
If you wish to be even sooner, you can too use a keyboard shortcut to open Highlight. Merely press the Command key + spacebar, and Concentration is going to pop up on the high of your display.
3. Convert Photographs to a Completely different Format in a Flash
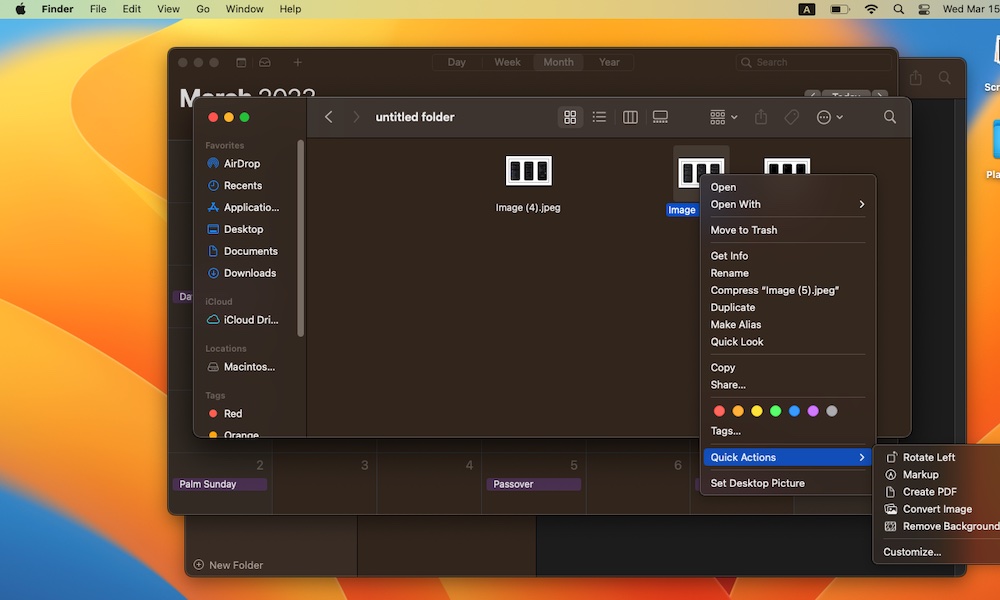
You should utilize your Mac’s Preview to export photos in several codecs, however if you wish to save a while, you need to use Finder to transform photos immediately.
- First, open Finder.
- Choose the picture you need to change and control-click (right-click) it.
- Go to Fast Actions.
- Choose Convert Picture.
- Select the format and the picture measurement you need.
- When you’re finished, click on on Convert to, and your Mac will do the remaining.
4. Don’t Let Your Dock Get within the Approach
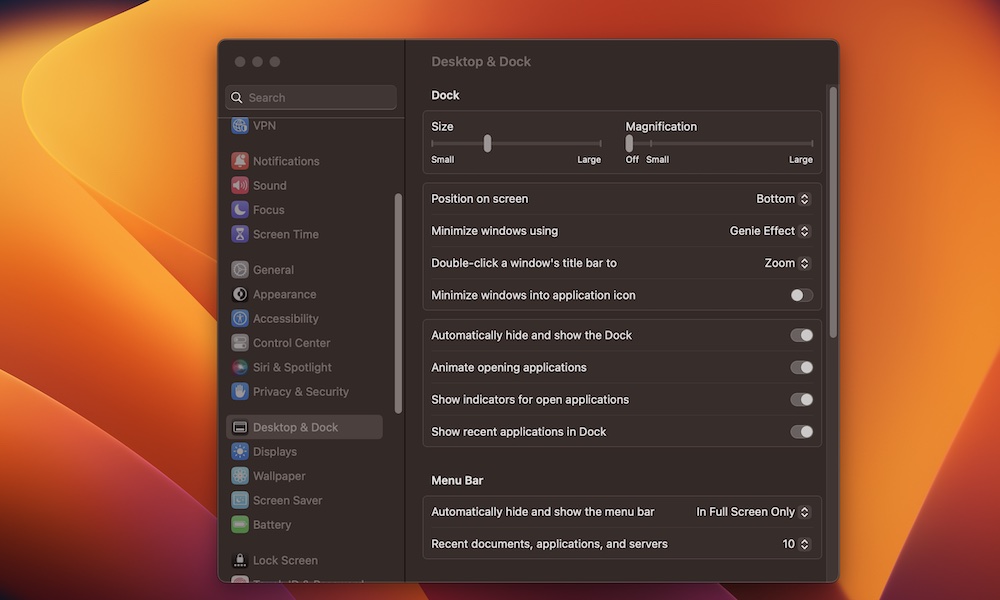
Your Dock is a good function, however it may be annoying to have it exhibiting on a regular basis, particularly in case your Mac’s display isn’t the most important.
The excellent news is which you can conceal your Dock and solely see it whenever you want it by doing the next:
- Click on on the Apple menu within the high left nook of your display.
- Go to System Settings.
- Scroll down on the left sidebar and click on Desktop & Dock.
- Scroll down and toggle Routinely conceal and present the Dock on.
5. Grasp Trackpad Gestures
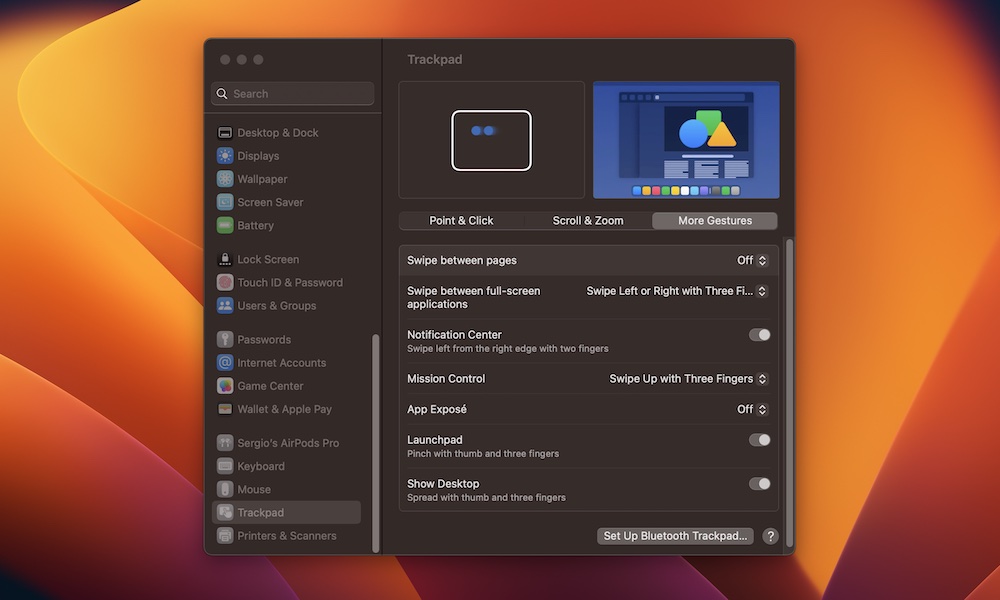
When you have a MacBook or are utilizing Apple’s Magic Trackpad, you need to use a listing of many various trackpad gestures that may make your life loads simpler.
To get you began, listed here are some gestures you need to use:
- Swipe up with three fingers to see all of your open apps. Swipe down to return to your most up-to-date app.
- Pinch your thumb and three fingers collectively to open Launchpad. Pinch them once more to shut it.
- Swipe to the left or proper with three fingers to modify between your open apps. Remember the fact that it will solely work you probably have at the very least one app in full-screen or Break up View.
Would you like extra gestures? You possibly can go to your settings and add or customise just a few gestures like this:
- Click on the Apple menu within the high left nook of your display.
- Open System Settings.
- Scroll down on the sidebar and choose the Trackpad.
- Choose the Extra Gesutres tab close to the highest of the window.
- Allow and customise any gestures you need.
6. Begin Utilizing Stage Supervisor
Stage Supervisor is a function that was first launched in macOS 13, often known as Ventura. This helps you give attention to one app at a time and retains all of your different open apps on the facet with the intention to change between them in a flash.
To make use of Stage Supervisor, that you must click on the Management Heart within the high proper nook of your display after which activate Stage Supervisor. Your apps will change place, and also you’ll solely give attention to the app you might be at the moment utilizing.
In order for you, you’ll be able to customise Stage Supervisor like this:
- Go to the Apple menu and click on on System Settings.
- Scroll down and choose Desktop & Dock.
- Scroll down once more and click on Customise subsequent to Stage Supervisor.
- Now customise Stage Supervisor nevertheless you need.
- Once you end, click on on Achieved within the backside proper nook.
Change into Extra Productive With Your Mac
Your Mac is able to so many issues that it’s not possible to know all of them. Exploring new options or instructions are a good way of discovering out what works for you personally. Test again with us as we publish extra concepts frequently. Now, simply choose your favourite tip, and get began.
Associated: Get 2021 MS Workplace on your Mac for $49.99 (one time fee solely)
Lastly, when you’re searching for productiveness apps on your iPhone or iPad, we not too long ago printed an article protecting this matter.